Wednesday, June 20, 2012

DIY Detachable Peter Pan Collar


Disclaimer : Celine Jo does not usually sew and she does not have any experience in sewing for crafts & clothing.


Made this collar sometime last month because initially I insisted on not buying another dress to qualify for an event that went for the vintage theme.

Well, since I wanted to try my best not to spend on another dress, this is how far I have gone in my attempt...


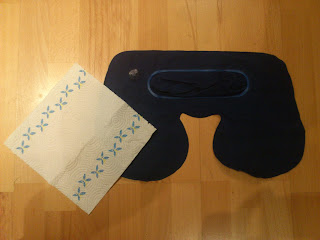
I have no template, so I just use a deflatable neck pillow as a guide. And also a kitchen towel to help alter the shape.


Yes, I know this looks awfully ugly. But this is what I call determination. One can try right? Wait till you see the result at the end of this post.


My made do template kinda worked. For keeping it cost free, I used a fabric I already have.


Cut these two identical shapes.


Then, I hand sewn them together as neat as neat possible. To make it look a little less bland and more vintagey, lace trimming was added. It's still cost free ;)


Oh, by the end of the night, I was regretting the determination I had. Hand sewing is so tedious
=_=! And not to mention I don't usually sew unless I have to reattach a button or mend a hole. *Pssst* I even avoid wearing those clothing that needs sewing/mending for quite a while till I actually need them again :p


Anyway, this is how my dress looks like with the detachable collar I made. And guess what? After all that effort, I ended up not wearing it to the event. Ahaks!

It's a valuable experience but nonetheless I don't think I would attempt it again without a proper template & a sewing machine.

Recently, am back on considering getting a sewing machine for making more crafts. Singer, Brother & Toyota made it to the list. Leaning towards Singer as she is the pioneer in sewing industry and it would be easier to get it fixed in any country. But cost wise, I could get a Brother at a more affordable price with 3-month instalments. I guess Toyota is now out of the league as I see it more of a car brand. Haha.



Tuesday, June 12, 2012

DIY Millinery Hat


My hubs & I were invited to a wedding with the dress code - 1950s. I don't quite have a 1950s dress but the basic requirement stated in the invite was 'hats for ladies & suits for men'. So, I just kept to the hat idea ;)

I had recently cut my waist-length hair to a funky-assymetrical-short length. Hats aren't exactly ideal for the new spiky hair.


So I decided to take on an interesting project to make myself a small millinery hat that goes with the hairstyle & matches my dress. A blue one!

Initially thought I would wear something purple, thus the colour palette below.


Bought the tiny black millinery hat from a local departmental store's craft section for only £2. Wrapped it with a white lace which I painted blue with my graphic markers and then I padded it to add a hair clip on the inside.


Got a plain blue flower corsage, darkened some petals with blue graphic marker to elevate it from the flat colour and added some beads & feather to glam it up.

To make the hat a tad more impressive, I added the copper mesh ribbon which was sparsely painted with metallic blue paint, and the white veil-netting.


And this was how I looked like in my vibrant dress with the matching blue millinery hat!


I bet it's quite hard to find a millinery hat that is not black, white, beige or red ;0)


.

Friday, June 8, 2012

Manicured Nails of Crafters


I’ve always admired how manicured the nails of the craft-making presenters or simply any of these ladies doing their own craft tutorials.

Ya, I understand the hands should be presentable especially if that’s all people see of you in your video. I love nail polish. The problem lies in the colours I dig…


These red hues are my all-time favs but they often get smudged on my crafts, cards & other surfaces. I have to also avoid other nail polish colours I have - black, copper & coral pink.

So I guess I will have to resort to my other favs - silver, luminous pastels, french pink & white when I know I would be making cards the following days. Do you have this problem with nail polish smudges too? Pleeeeeease tell me I am not the only one.


.
.

Thursday, June 7, 2012

Lighting Solution - Free!


It's brilliant! And it costed me nothing.

More than 1 week ago, I made a diy photo studio box to achieve better photos for my cards & craft items.
I realized I really need white lighting to aid my product shoot as and when... and not only when there is bright sunlight. Was uploading my cards' photos on Etsy the other day & I felt the photos could be taken in a better lighting.

Took a few days before I got an idea for this budget solution :) While watching TV, an idea suddenly came to mind - a blue transparency sheet could change my warm lighting to a cool one. So I immediately grab the sheet & secure it to my desk lamp with a rubber band and voila!


I conveniently used the table lamp which is already at my crafting space.


 Glad that the problem I had with insufficient lighting for the studio box is now resolved. Easy peasy and it costed me nothing. Hoorah!


.